This tutorial shows you how to deploy a Vaadin application to Google Cloud Run. Google Cloud run is a managed compute platform that lets you run containers directly on top of Google’s scalable infrastructure. On Cloud Run, your code can either run continuously as a service or as a job. Here I will show you how to deploy your Vaadin application as a Google Cloud Run service.
Before you begin
- To complete this tutorial, you need to sign up for a Google Cloud account at https://cloud.google.com.
- In the Google Cloud console, on the project selector page, select or create a Google Cloud project.
- Make sure that billing is enabled for your Cloud project. Learn how to check if billing is enabled on a project.
- You need to install Docker Desktop or Docker Server on your machine first.
Costs
This tutorial uses the following billable components of Google Cloud:
Step 1: Install and Set Up Google Cloud SDK
Download and install Google Cloud SDK. Follow Google’s instructions for installing the Google Cloud SDK. This will install a command on your system named gcloud.
After it’s installed, run the following commands from a terminal window:
# (1)
gcloud services enable artifactregistry.googleapis.com

# (2)
gcloud services enable run.googleapis.com
If you’re asked to authorize to use of your credentials, do so.
- Enables Artifact registry API. We will use it to store our Vaddin application docker image
- Enables Cloud Run API
Note: You can also enable the API using the APIs & Services section of the console.
Step 2: Download a Starter App
Download a minimal Vaadin project and unpack the downloaded zip into a folder on your computer
Step 3: Add a Dockerfile To the Downloaded Application
Copy and paste the Dockerfile from a fresh Vaadin Start project into your project.
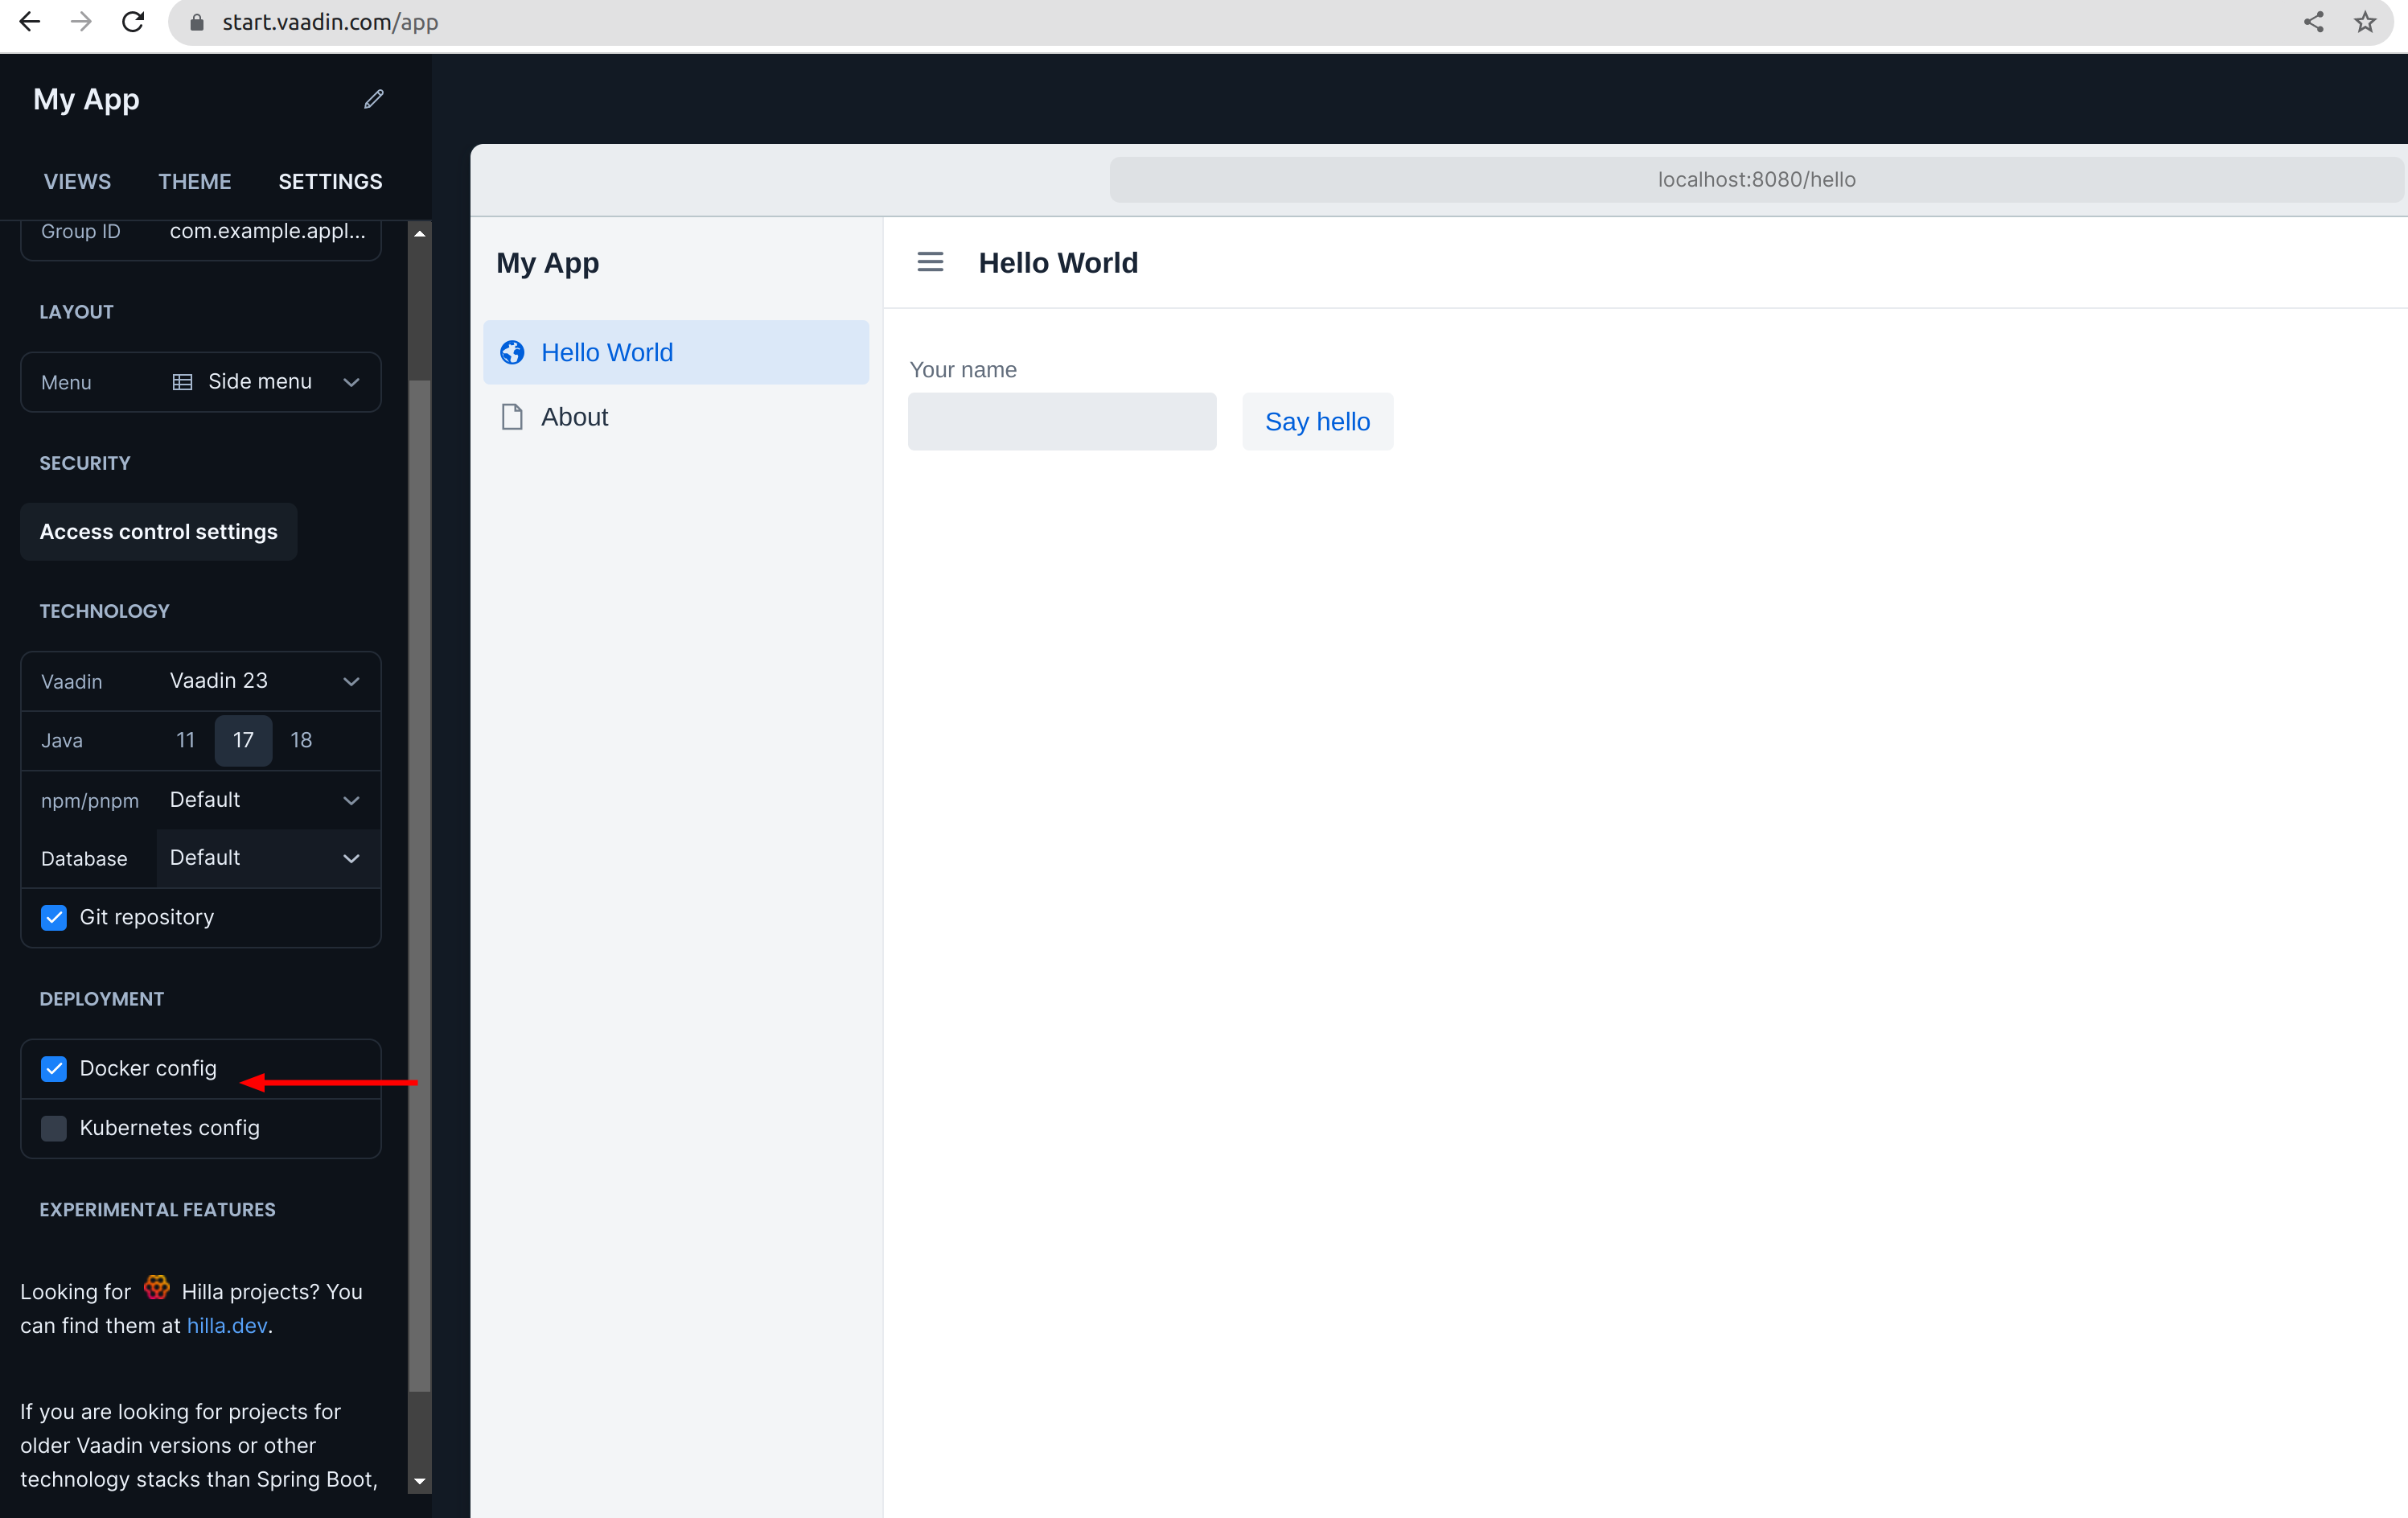
You can use Dockerfile described in Vaadin documentation.
Here is a typical Dockerfile from Vaadin Start:
# Stage that builds the application, a prerequisite for the running stage
FROM maven:3-openjdk-17-slim as build

# Stop running as root at this point
RUN useradd -m myuser
WORKDIR /usr/src/app/
RUN chown myuser:myuser /usr/src/app/
USER myuser

# Copy pom.xml and prefetch dependencies so a repeated build can continue from the next step with existing dependencies
COPY --chown=myuser pom.xml ./
RUN mvn dependency:go-offline -Pproduction

# Copy all needed project files to a folder
COPY --chown=myuser:myuser src src
COPY --chown=myuser:myuser frontend frontend
COPY --chown=myuser:myuser package.json ./

# Using * after the files that are autogenerated so that so build won't fail if they are not yet created
COPY --chown=myuser:myuser package-lock.json* pnpm-lock.yaml* webpack.config.js* vite.config.js* ./

# Build the production package, assuming that we validated the version before so no need for running tests again
RUN mvn clean package -DskipTests -Pproduction

# Running stage: the part that is used for running the application
FROM openjdk:17-jdk-slim
COPY --from=build /usr/src/app/target/*.jar /usr/app/app.jar
RUN useradd -m myuser
USER myuser
EXPOSE 8080
CMD java -jar /usr/app/app.jar
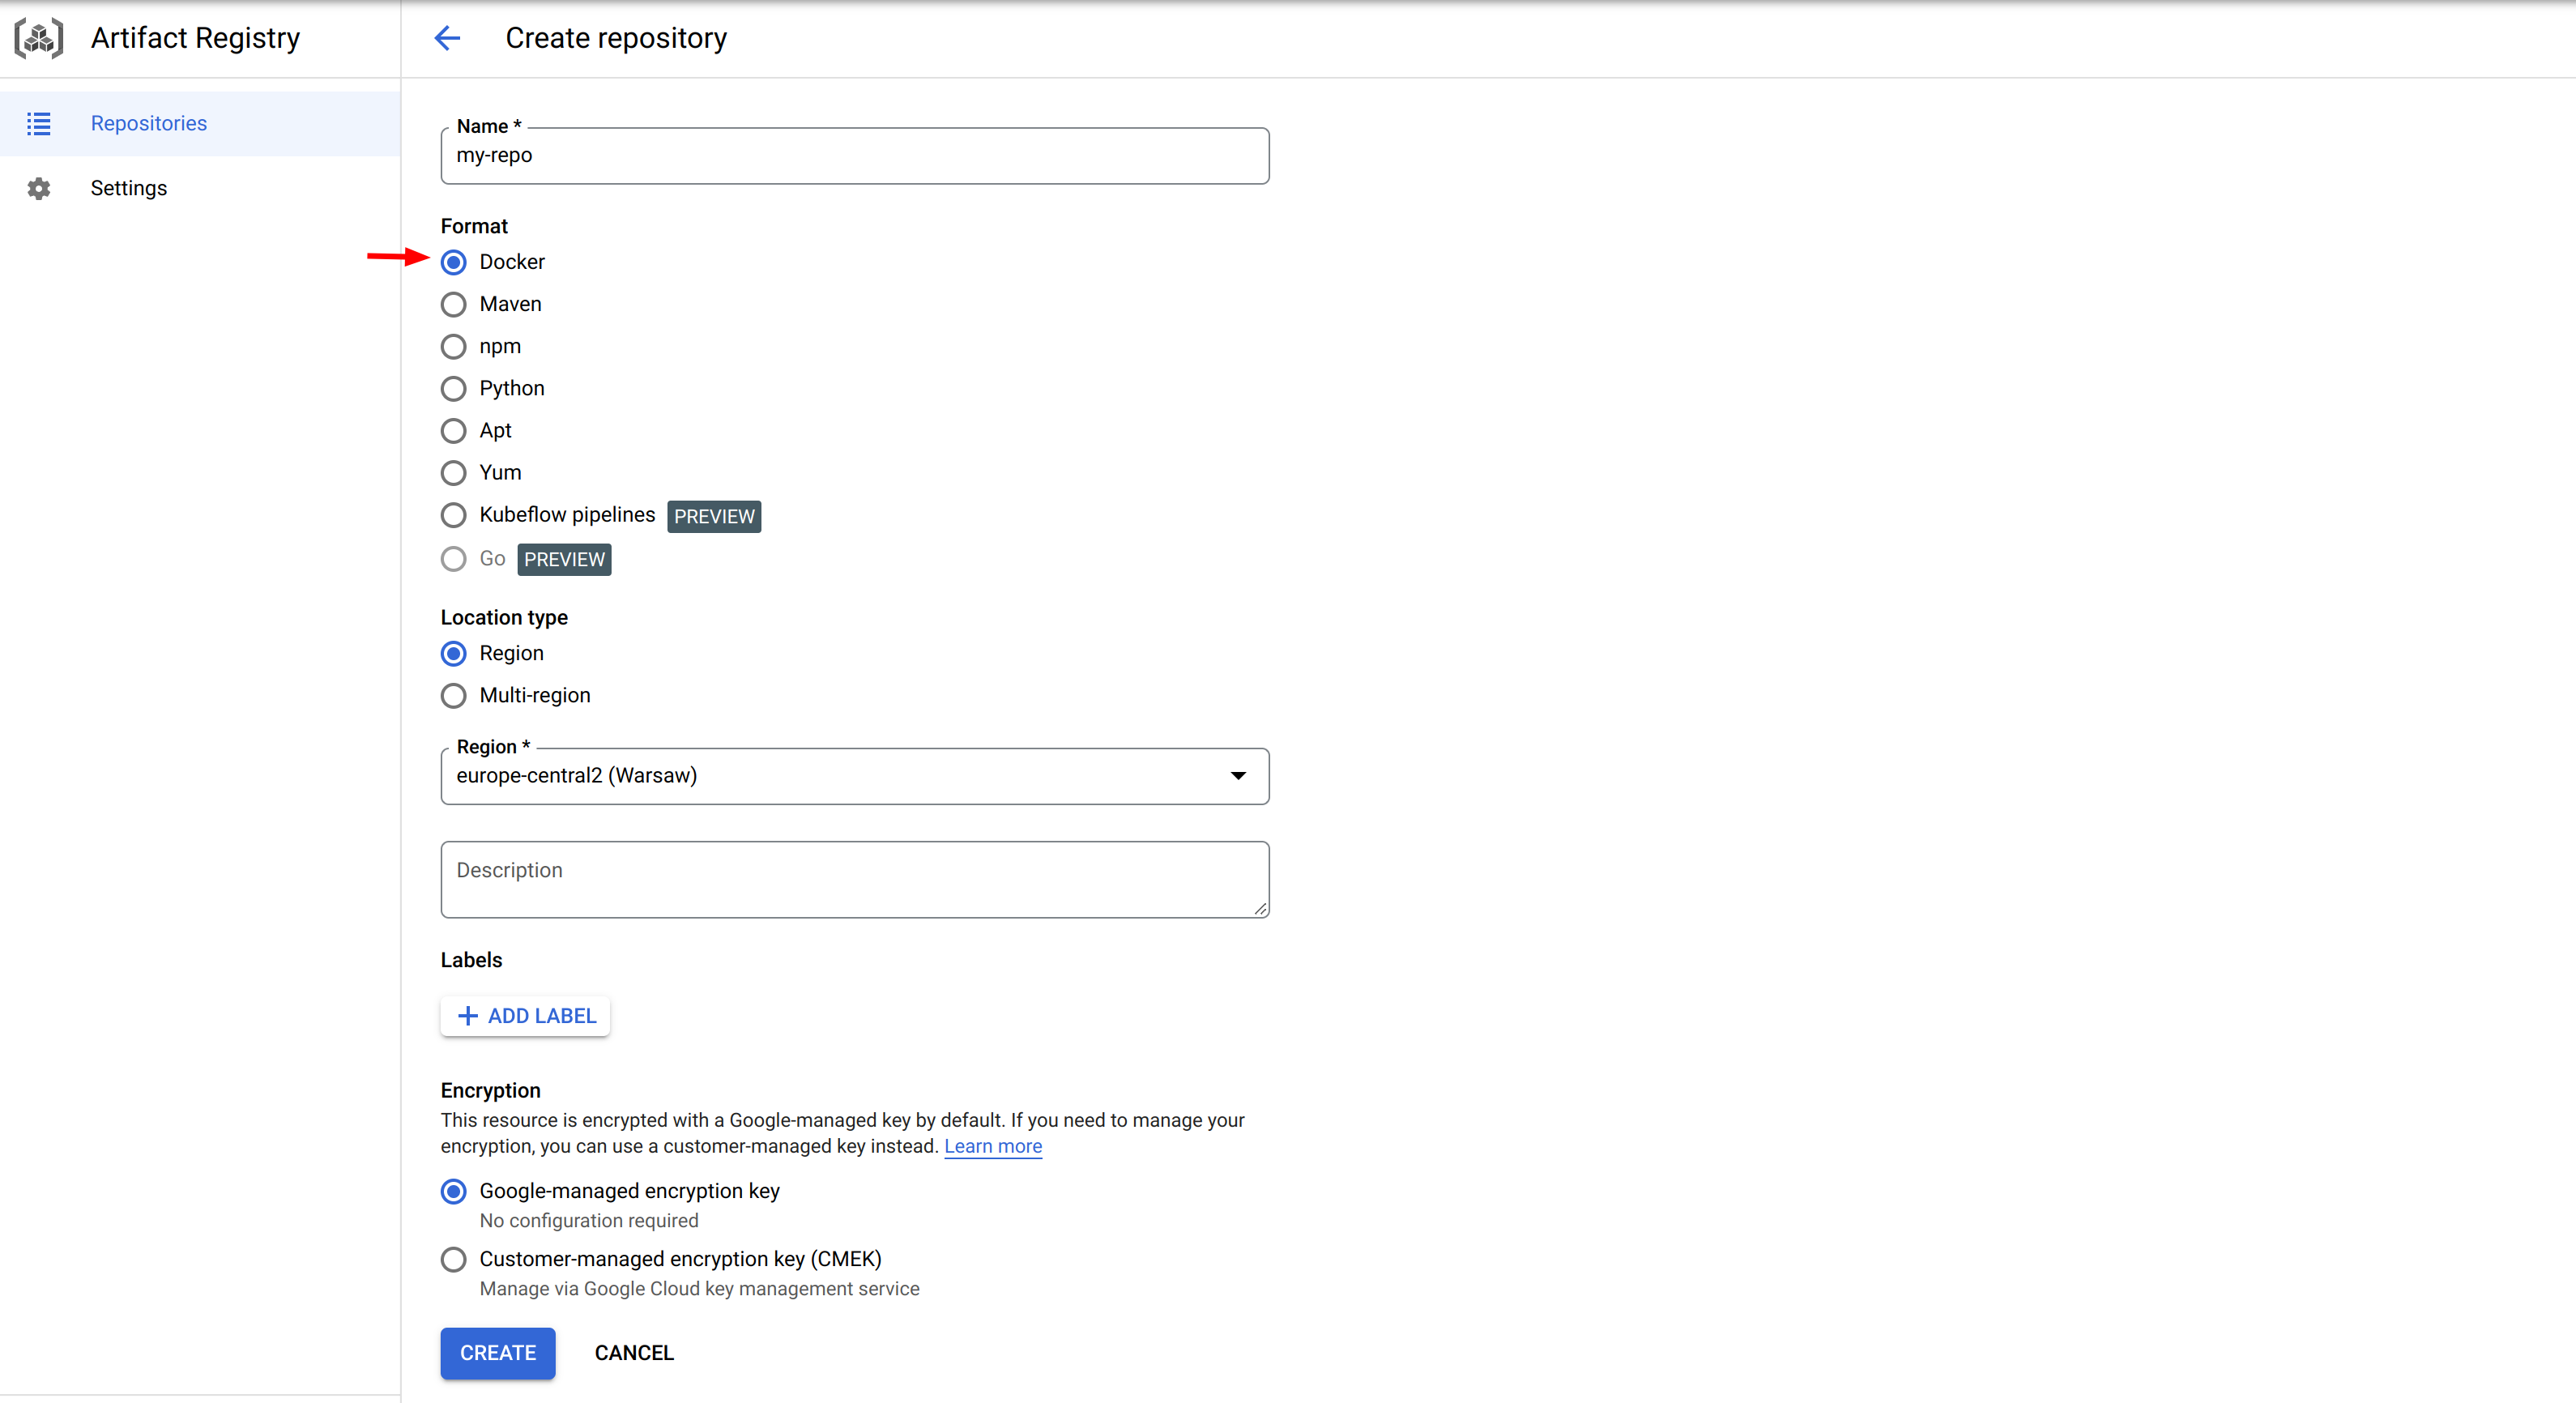
Step 4: Create a New Artifact Registry Repository
Create a new docker repository following Google’s instructions. Let’s name it my-repo
It will create your docker repository. It should look like this
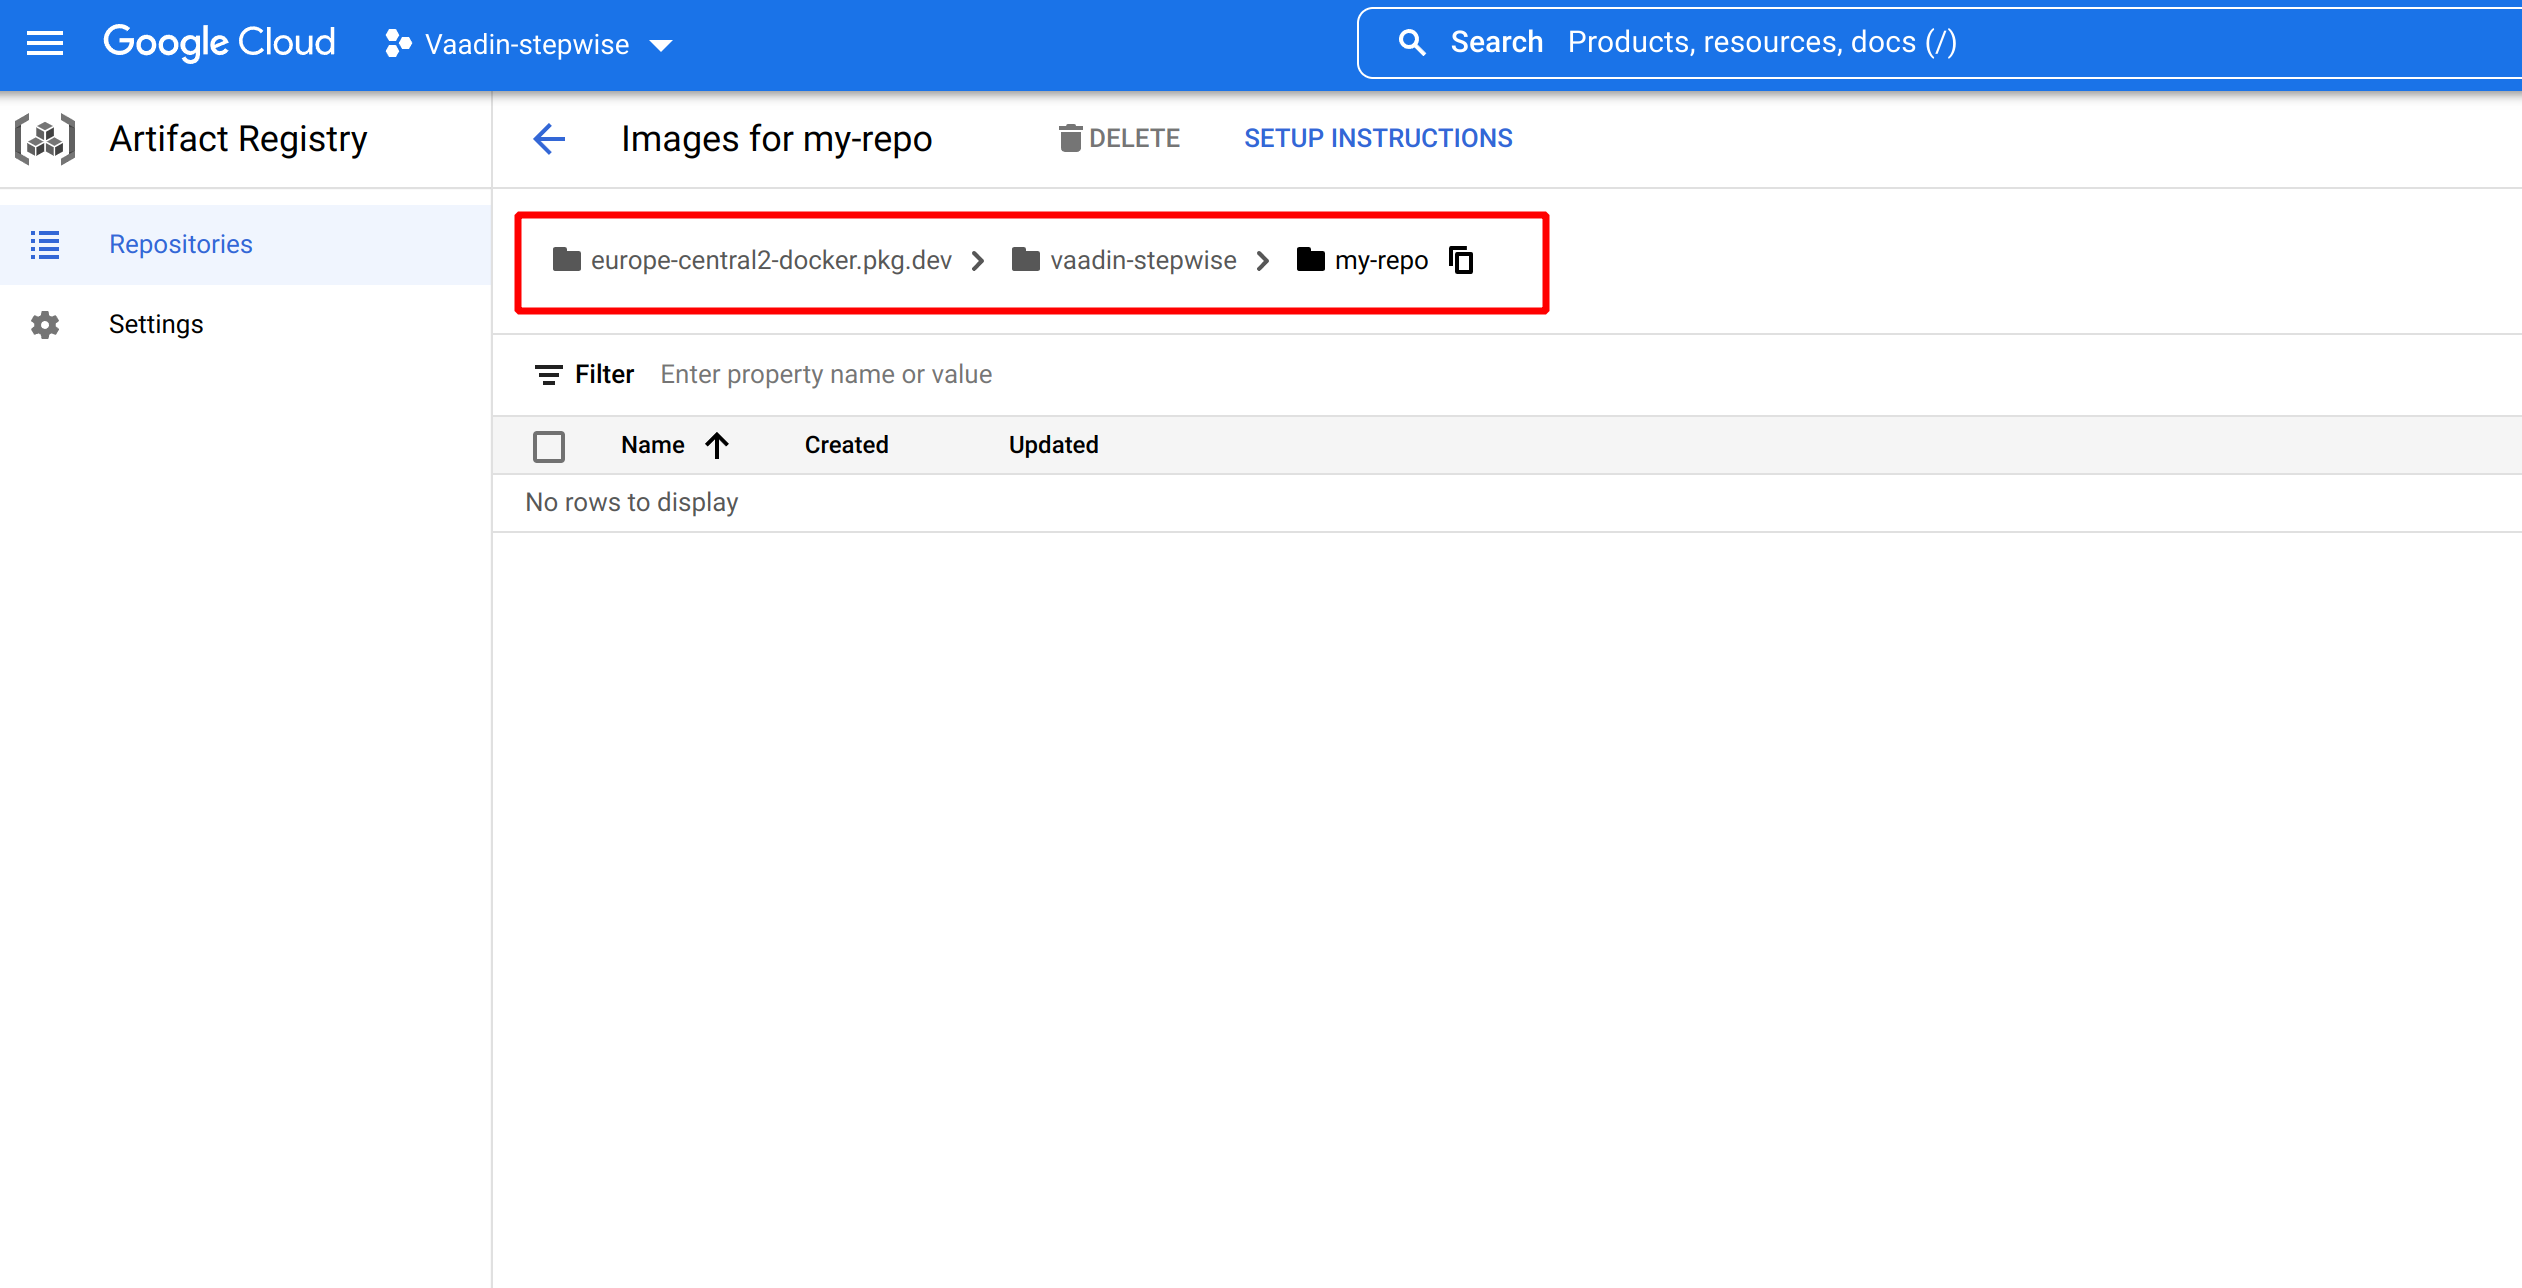
You can see that the whole path to the repository is europe-central2-docker.pkg.dev/vaadin-stepwise/my-repo . The format of the repository path is:
$LOCATION-docker.pkg.dev/$PROJECT_ID/$REPOSITORY
In your case replace the following values:
- LOCATION is the regional or multi-regional location of the repository where the image is stored, for example, europe-central2 or eu
- PROJECT is your Google Cloud console project ID. If your project ID contains a colon (:), see Domain-scoped projects.
- REPOSITORY is the name of the repository where the image is stored
Step 5: Configure Docker Locally
Run the following command to configure gcloud as the credential helper for the Artifact Registry domain associated with this repository’s location:
gcloud auth configure-docker europe-central2-docker.pkg.dev
Step 6: Build Docker Image
Go to the directory where your app is extracted and where you put the Dockerfile.
Run the following commands:
# (1)
docker build -t europe-central2-docker.pkg.dev/vaadin-stepwise/my-repo/my-app .

# (2)
docker push europe-central2-docker.pkg.dev/vaadin-stepwise/my-repo/my-app
- It builds your Vaadin app and put the jar into an image. The image path follows the previously mentioned rules. Here the image is named my-app
- It pushed the image to the GCP Artifact Registry
Step 7: Deploy to Google Cloud Run
Go to Cloud Run in Google Cloud Console and click Create Service button. A Cloud Run service provides you with the infrastructure required to run a reliable HTTPS endpoint. Your responsibility is to make sure your code listens on a TCP port and handles HTTP requests.
You should see a service creation page similar to the following
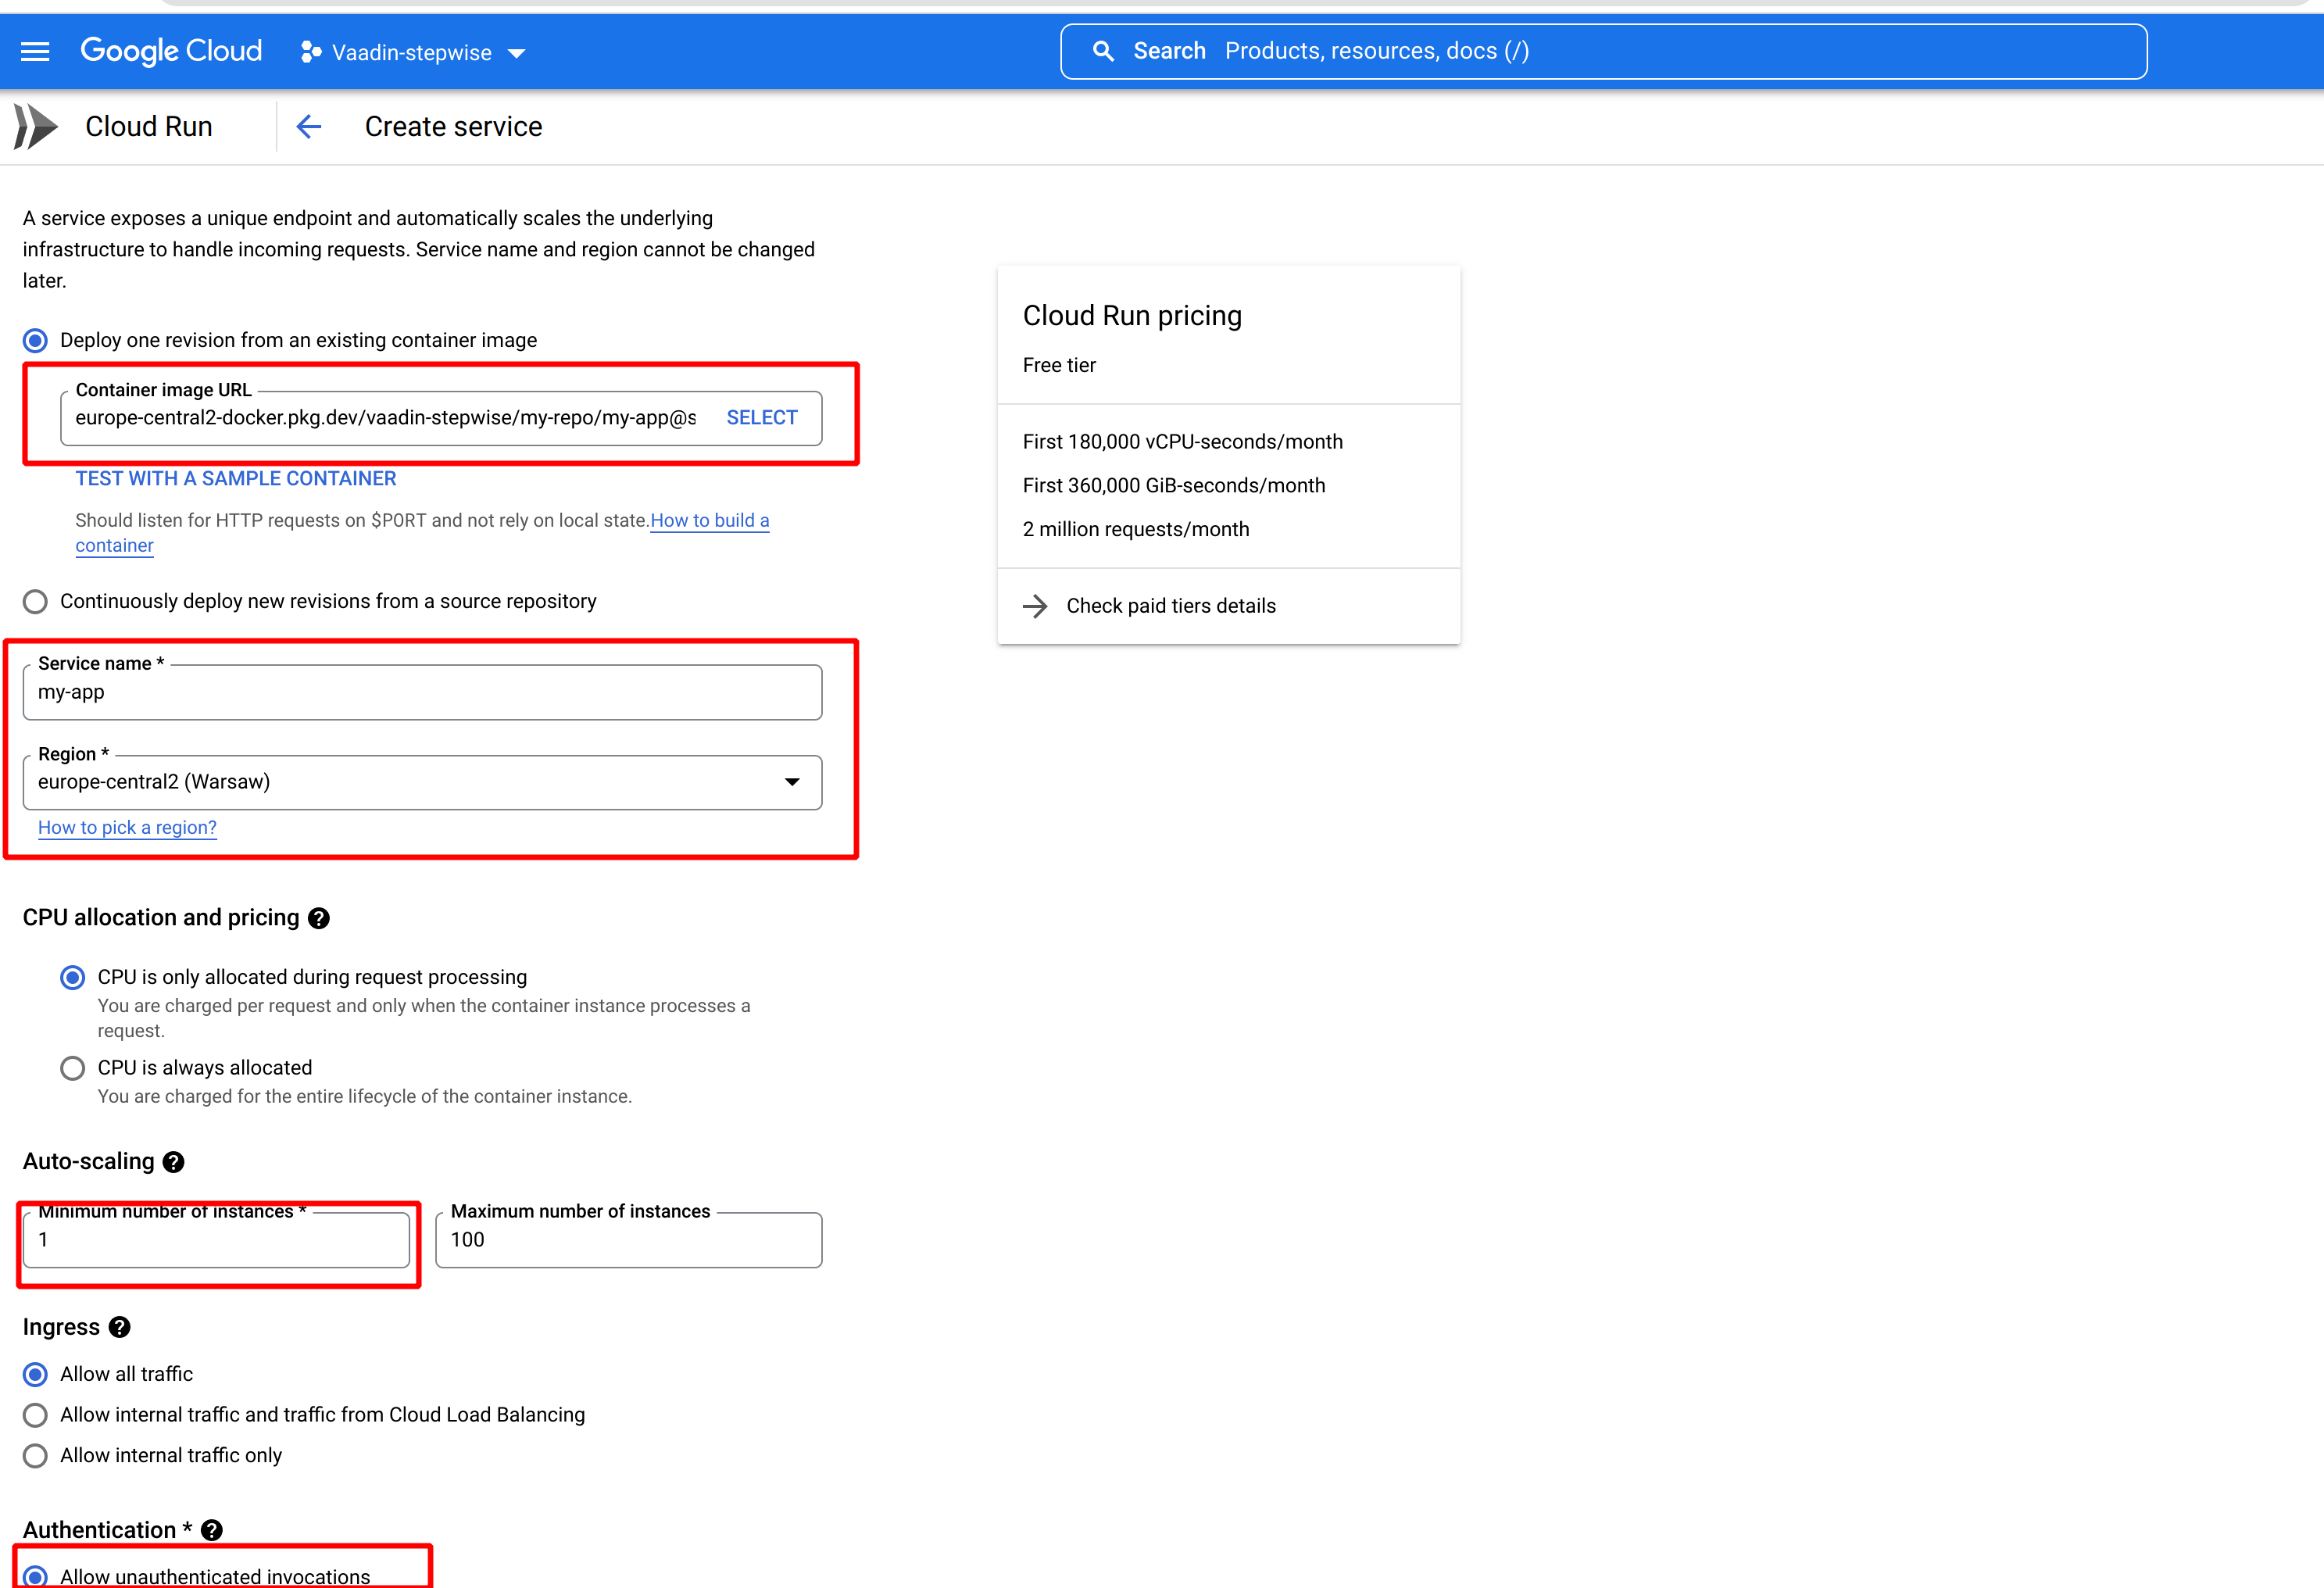
- In the container image URL field choose the image that was pushed into the repository in the previous step.
- Choose the service name and appropriate region.
- In the auto-scaling section set a minimum number of instances to 1 to reduce cold starts.
- In the Authentication section choose Allow unauthenticated invocations.
- Open the Container, connections, security section and change Memory to 1GB.
- Switch to the Connections tab and check Session affinity option. With session affinity enabled, a client will reach the same container instance. Session affinity does not mean that the container instance is dedicated only to one client.
- Click create button
After a few seconds, you should see a page similar to the bellow one:
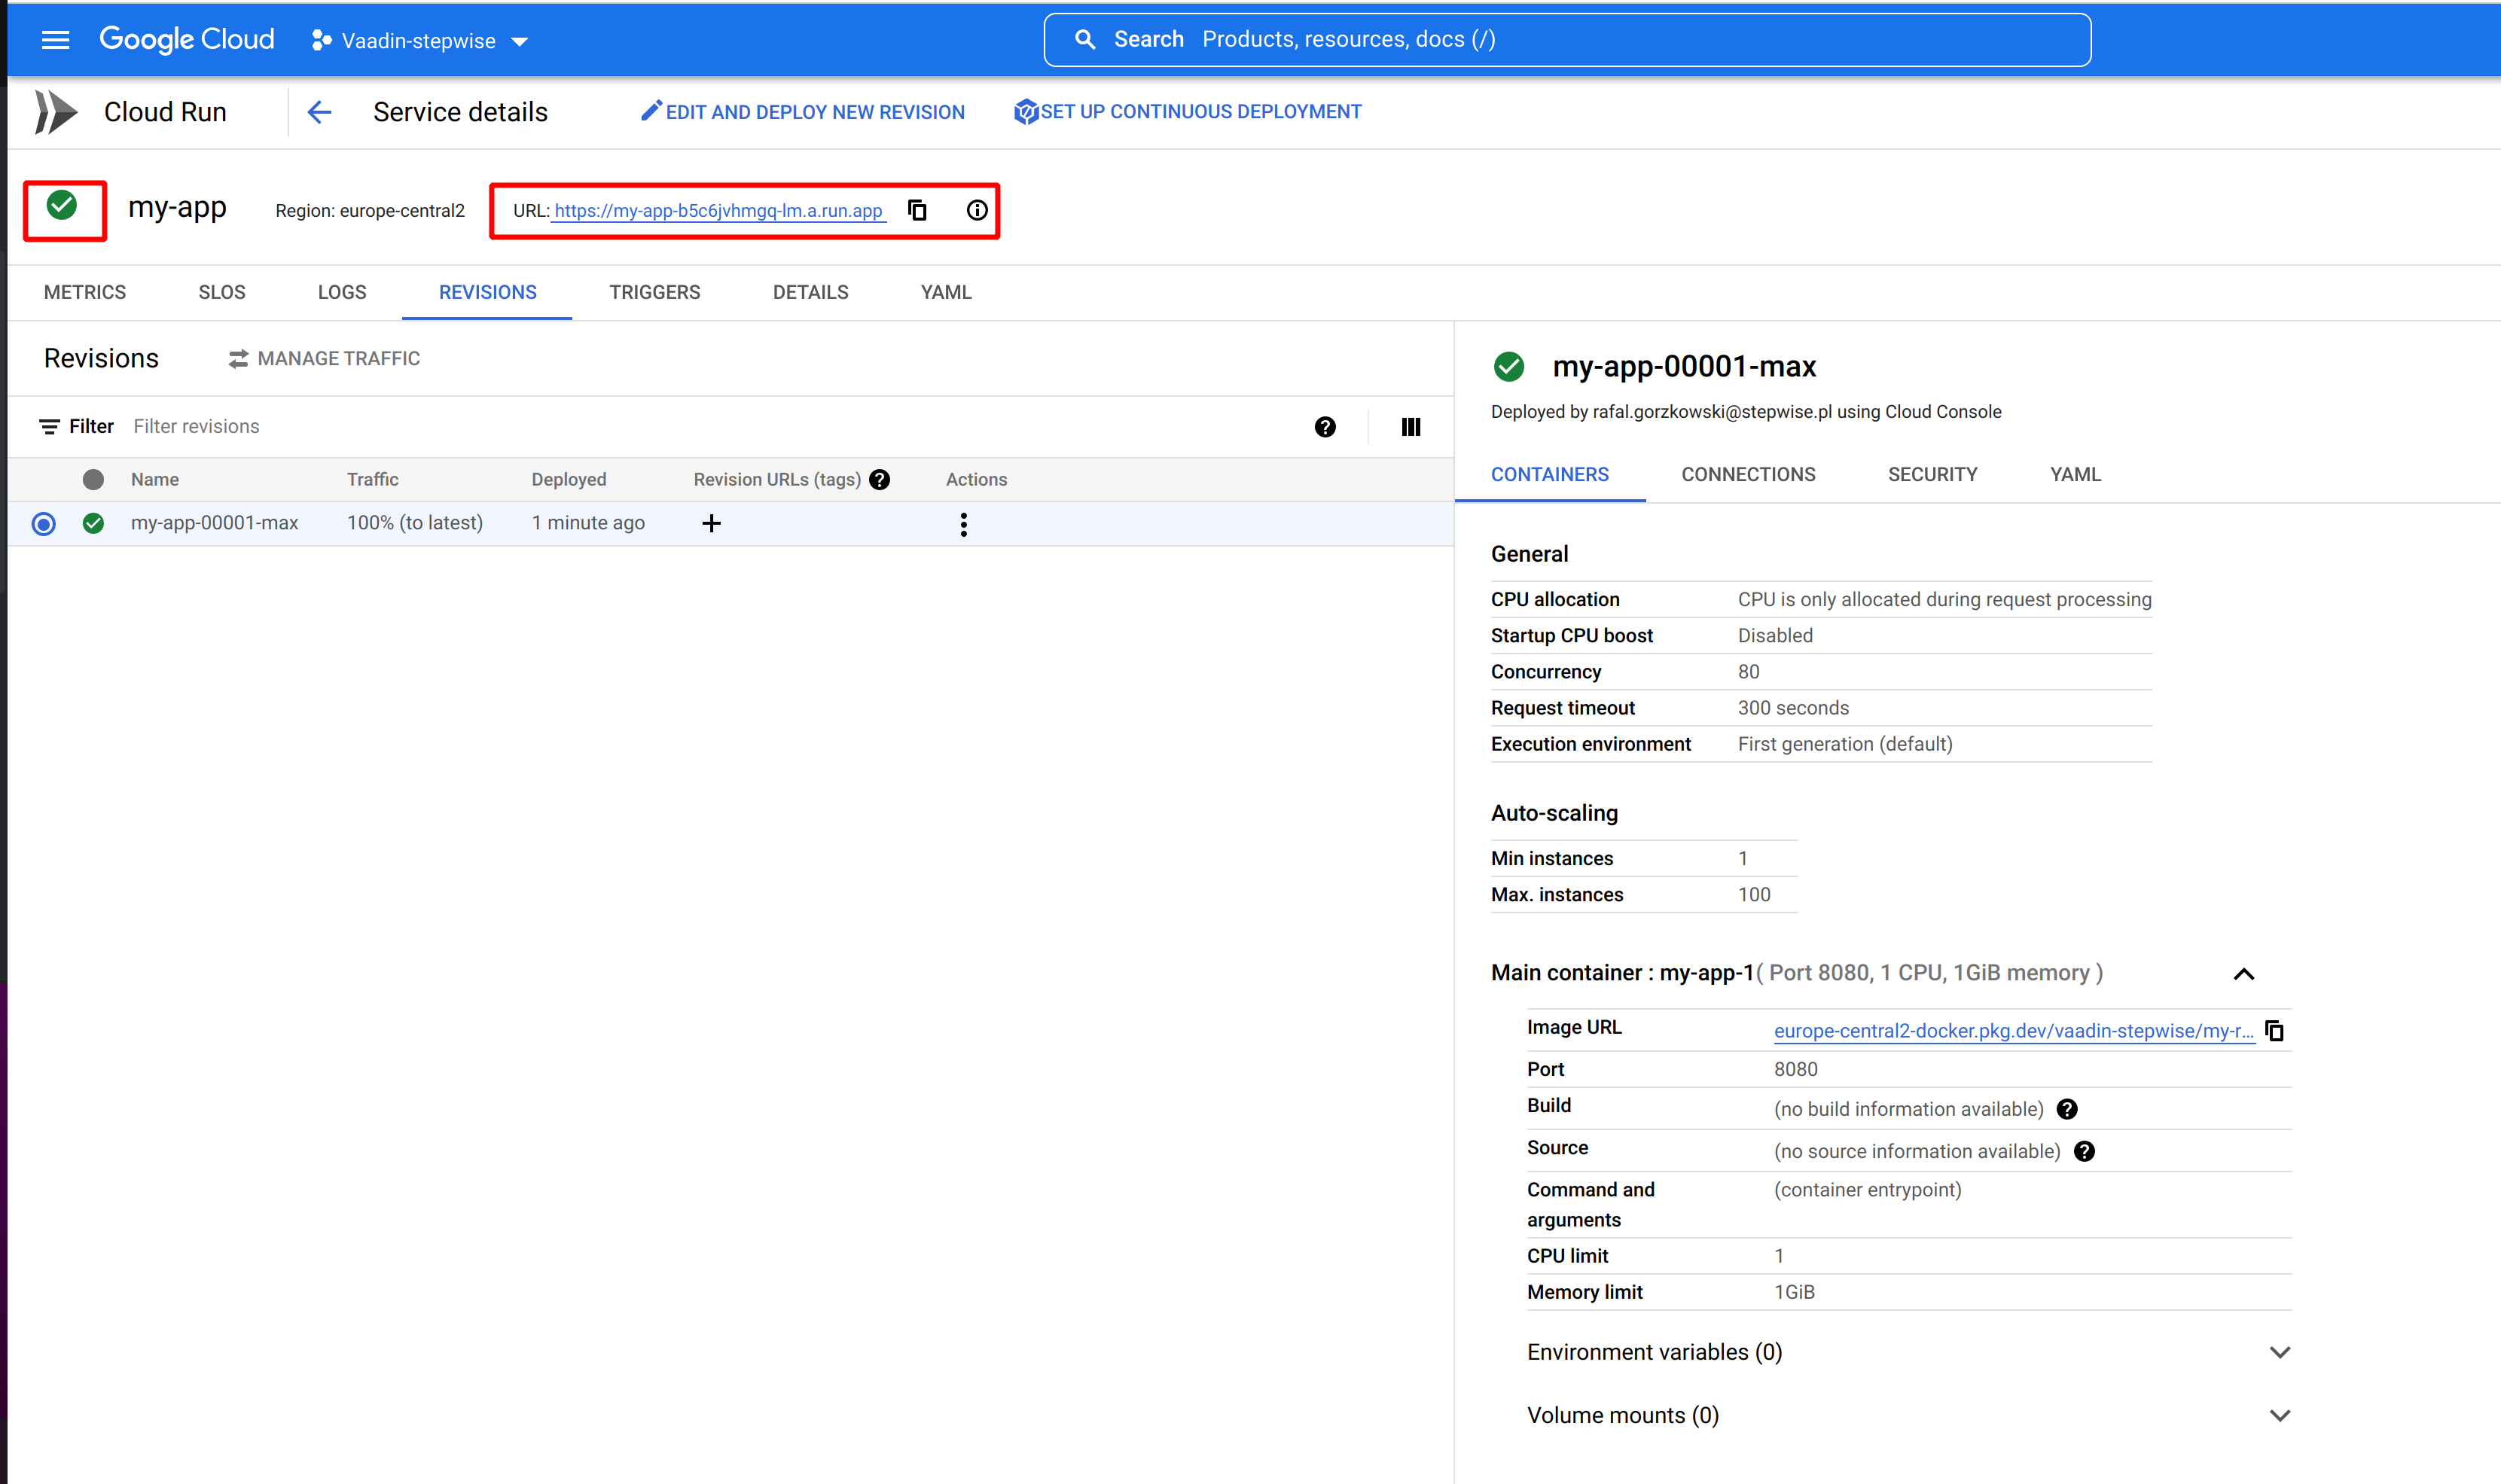
Your Vaadin application is deployed and running.
You can copy URL address and open it separate tab. You should see your Vaadin Application.

You can also deploy a Cloud Run service with gcloud command. It’s as simple as running bellow command:
gcloud run deploy my-app \\
--image=europe-central2-docker.pkg.dev/vaadin-stepwise/my-repo/my-app:latest \\
--allow-unauthenticated \\
[email protected] \\
--memory=1Gi \\
--min-instances=1 \\
--use-session-affinity \\
--region=europe-central2 \\
--project=vaadin-stepwise
Vaadin application source code with Dockerfile on Github.